Setup the CI using the shared template
The Shared CI Infrastructure is project agnostic. It is tuned for open-source projects hosted on GitHub and willing to run CI on a GitLab instance. It currently only supports a handful of Livermore Computing machines, but more could be added without disrupting the design.
The pre-requisite for using the RADIUSS Shared CI Infrastructure, provided that your projects is hosted on GitHub, is that you can trigger your build and test process with one command line.
Strict separation between the build and test process and the CI infrastructure greatly helps with maintenance: it is much easier to debug a standalone script, which can be run outside CI, than when the process is encoded in the CI YAML files.
Note
In our own RADIUSS CI setups, we do not split the build and the test phases because it adds complexity. This typically saves us from using artifacts. However, we do not prevent projects from implementing more complex workflows. Please refer to Implement Complex CI Worflows for more details on multi-steps workflow with RADIUSS Shared CI.
Our RADIUSS projects typically leverage Spack to manage the installation of the dependencies and configure the project. We describe this as a Shared Build Infrastructure documented in RADIUSS Spack Configs. Then, building and testing is handled in custom scripts.
RADIUSS Shared CI
By sharing the CI definition, projects share the burden of maintaining it.
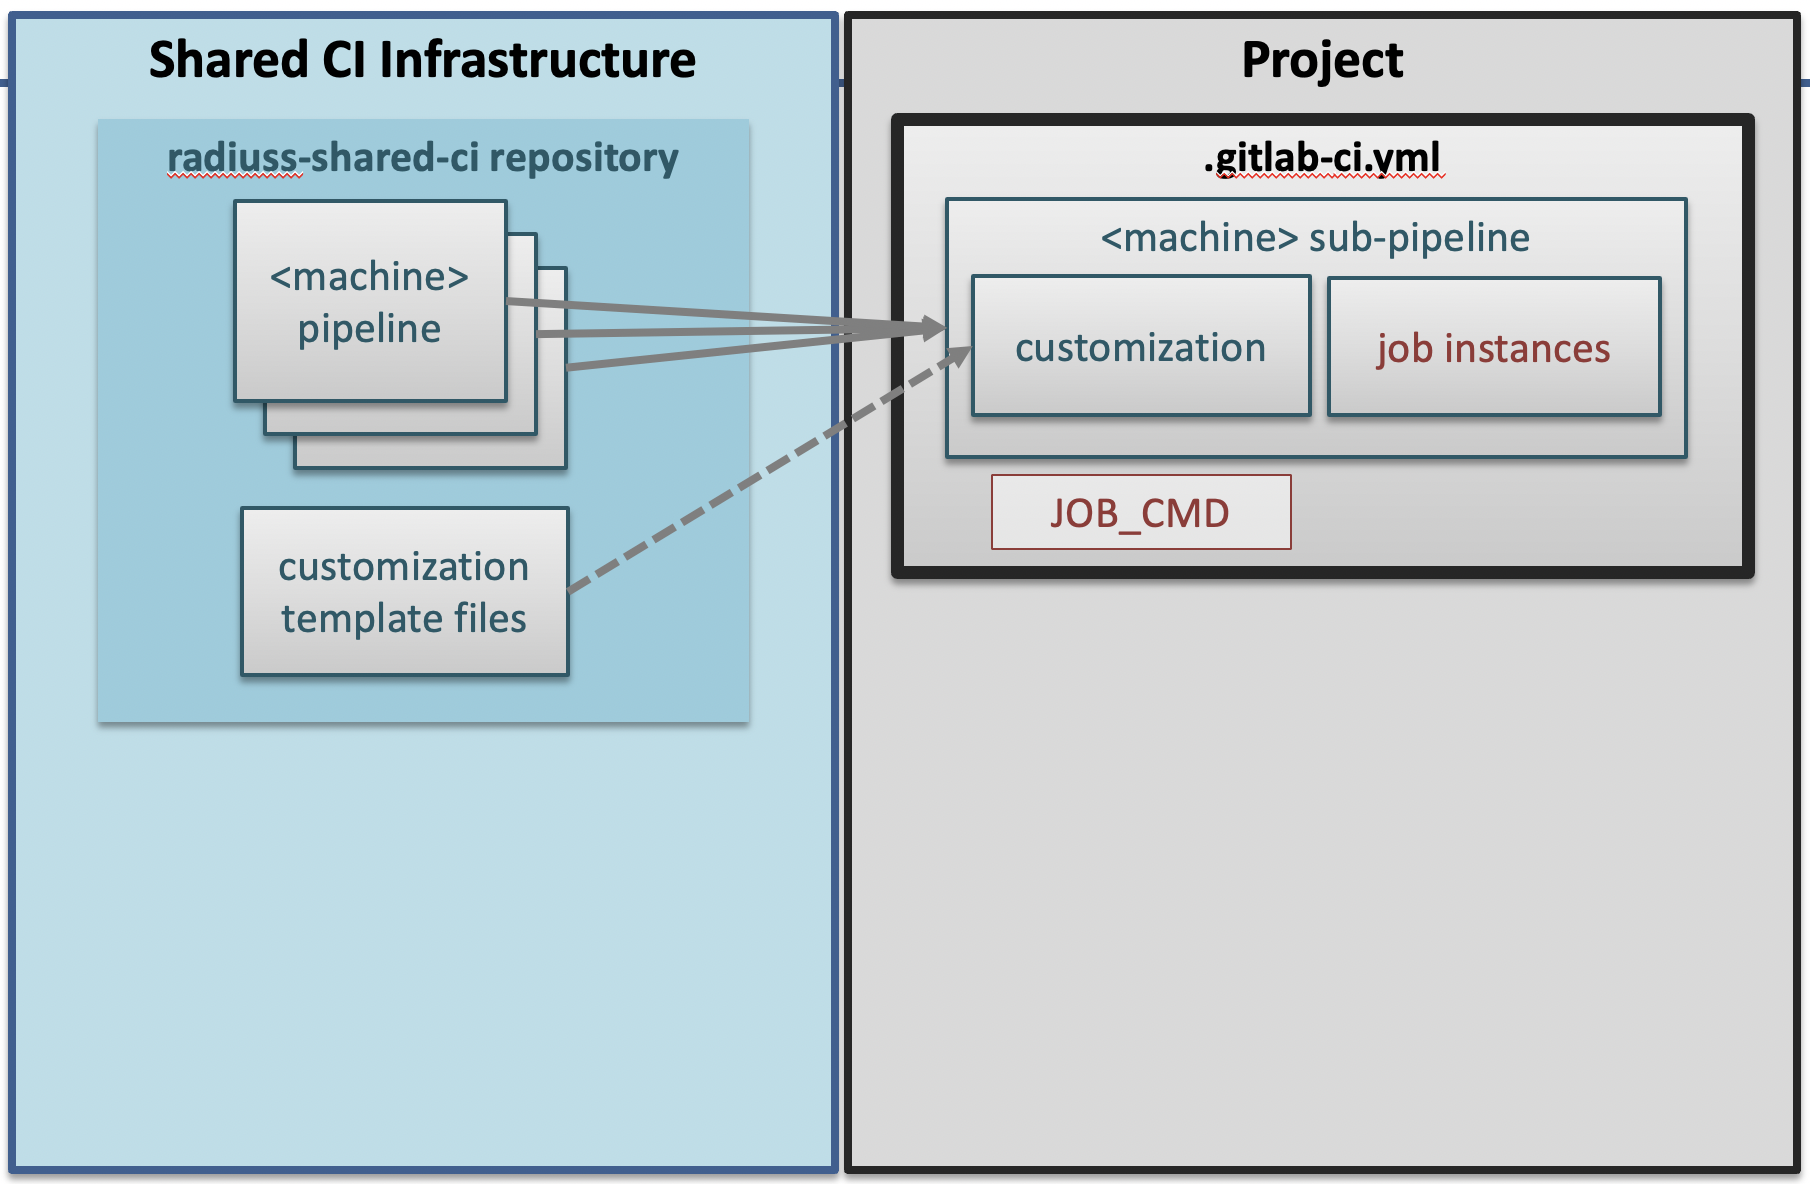
With a centralized CI configuration that is shared by projects, we create an interface between local and shared configurations. We try to keep this interface minimal, while allowing for project-specific customization.
Projects only need to set some variables and add CI jobs instances (inheriting
from the job template) to get the CI to work. Files in the customization
directory allow for fine tuning and extensibility.
Note
GitLab allows projects to include external files to configure their CI. We rely on this mechanism to share most of the CI configuration among projects.
File structure

The RADIUSS Shared CI repository contains files that are included remotely as well as template files that needs to be copied over and completed. Each pipeline file also defines a job template (in the sense of GitLab CI YAML syntax) providing the core settings that your own jobs will extend.
The short version
The following sequence of steps and commands summarizes the process of integrating the RADIUSS Shared CI infrastructure into your project.
### Prerequisites
# write CI script

### CI Setup
cd my_project/..
git clone https://github.com/LLNL/radiuss-shared-ci.git
cd my_project
cp ../radiuss-shared-ci/customization/gitlab-ci.yml .gitlab-ci.yml
mkdir -p .gitlab/jobs
cp ../radiuss-shared-ci/customization/subscribed-pipelines.yml .gitlab
cp ../radiuss-shared-ci/customization/custom-jobs-and-variables.yml .gitlab
cp ../radiuss-shared-ci/jobs/\<machine\>.yml .gitlab/jobs/<machine>.yml
# You may use the <machine>.yml file as a starting point to add jobs.
vim .gitlab/subscription-pipelines.yml
# comment the jobs associted to <CI_MACHINE> you don't want.
vim .gitlab/custom-jobs-and-variables.yml
# set the variables according to your needs.
vim .gitlab/jobs/<machine>.yml
# Add jobs or override some of the shared ones.

### Non-RADIUSS projects
open https://lc.llnl.gov/gitlab/<group>/<project>/-/settings/ci_cd
# Set CI/CD variable GITHUB_TOKEN to hold token with repo:status
# permissions.
Jump to a corresponding section for details on Customize the CI, Add jobs.
The detailed version
Our CI implementation can be divided in four parts:
local build-and-test script
shared files
customization files
jobs
Setting up the CI consists of four corresponding steps.
Write CI Script
The first step is to prepare a CI script that will be called using the
JOB_CMD variable in the CI. Once you have that script, you are ready to
move on to the CI setup.
Core CI implementation
Start by cloning the RADIUSS Shared CI project locally, for example next to the project you intend to add CI to.
cd my_project/..
git clone https://github.com/LLNL/radiuss-shared-ci.git
cd my_project
By default, GitLab expects a .gitlab-ci.yml file to interpret the CI setup.
We provide one in customization/gitlab-ci.yml that projects can copy over
(don’t forget to add a .). Place the file in the top-level directory of
your project.
cp ../radiuss-shared-ci/customization/gitlab-ci.yml .gitlab-ci.yml
In the .gitlab-ci.yml file, there are some variables that you need to adapt
to your project. They are described in the following table:
Parameter
Description
LLNL_SERVICE_USERProject specific Service User Account used in CI (optional but recommeded)
CUSTOM_CI_BUILD_DIRIf not using a service user, where to locate the CI working directories (prevent exceeding your disk quota)
GIT_SUBMODULES_STRATEGYControls strategy for the clone performed by GitLab. Consider
recursiveif you have submodules, otherwise comment it.
BUILD_ROOTLocation (path) where the projects should be built. We provide a sensible default.
SHARED_CI_REFThe reference (branch, tag) you would like to use in RADIUSS Shared CI repository
GITHUB_PROJECT_NAMEThe Project name on GitHub, used to send status updates
GITHUB_PROJECT_ORGThe Project organization on GitHub, used to send status updates
JOB_CMDThe command that runs the build and test script. Lets you name and store that script however you like.
ALWAYS_RUN_PATTERNThe regex pattern describing the branches that will skip the draft pull request filter test.
Note
If a variable is blank in the template file, then it does not require a value. If a variable has a value there (even “…”), it does require one.
Warning
We strongly recommend that you set your CI to use a service user account. This will enable you to add users to the associated service user account group so that they can interact with GitLab runners to restart test pipelines, for example. It will also simplify permissions and allocations management.
Your CI is now set up to include remote files from the GitLab mirror of the radiuss-shared-ci project.
We now need to complete the interface with the shared CI configuration.
In particular, the .gitlab-ci.yml file requires some files to be present
in your Git repository. These are described in the next few sections.
Customize the CI
We provide templates for the required customization files. You need to have a
.gitlab subdirectory in the top-level of your Git repository. Then,
you can copy the template files to that directory in your repo. For example:
mkdir -p .gitlab
cp ../radiuss-shared-ci/customization/subscribed-pipelines.yml .gitlab
cp ../radiuss-shared-ci/customization/custom-jobs-and-variables.yml .gitlab
We will now browse the files to see what changes they may require to suit your needs.
The .gitlab/subscribed-pipelines.yml file
In this file, you will select the machines you want to run tests on. Comment out the jobs (sections) for machines you don’t want, or don’t have access to.
Note
To add a new machine, please refer to Add a new machine.
The .gitlab/custom-jobs-and-variables.yml file
Here is a table that describes each variable present in the file. More details can be found in the file itself.
Parameter
Description
ALLOC_NAMEName of the shared allocation. Should be unique, our default should be fine.
<MACHINE>_SHARED_ALLOCParameters for the shared allocation. You may extend the resource and time.
<MACHINE>_JOB_ALLOCParameters for the job allocation. You may extend the resource and time within the scope of the shared allocation.
PROJECT_<MACHINE>_VARIANTSGlobal variants to be added to all the shared specs.
PROJECT_<MACHINE>_DEPSGlobal dependencies to be added to all the shared specs.
Note
If a variable is blank in the template file, then it does not require a value. If a variable has a value there, it does require one.
You may modify to the .custom_job job that will then be included in all you
CI jobs. This can be used to export jUnit test reports, for example. Changes
to that section are not mandatory.
Add jobs
We provide a template file to add jobs to each machine. You should create one
file per machine using this template. These files may be place in your
project’s .gitlab/jobs subdirectory and named <machine>.yml, where
<machine> is the machine name. They are required as soon as the
associated machine has been activated (uncommented) in the
.gitlab/subscribed-pipelines file.
In the provided template, you may remove the variable definition, uncomment and duplicate the example job and complete it with the required information:
Unique job names that will appear in CI.
Custom variables that will make that job unique.
Warning
GitLab supports long and complex job names. Make sure to pick names that are unique so that your extra jobs do not override a shared job.
Note
It is possible to import jobs from another repository. This is what we do in our RADIUSS projects to share some jobs and thus make sure we build with the same toolchains. See the dedicated How-To section for more details Import shared jobs.
Non-RADIUSS Projects
RADIUSS Shared CI features a customized status report mechanism that reports to to GitHub the CI status of each sub-pipeline (one per machine).
This feature requires the creation of a GitHub token with repo:status
permissions, and registering it as a CI/CD variable named GITHUB_TOKEN in
the project (or the group) on GitLab.
Visit https://lc.llnl.gov/gitlab/<group>/<project>/-/settings/ci_cd to
create the variable once the token has been generated on GitHub.